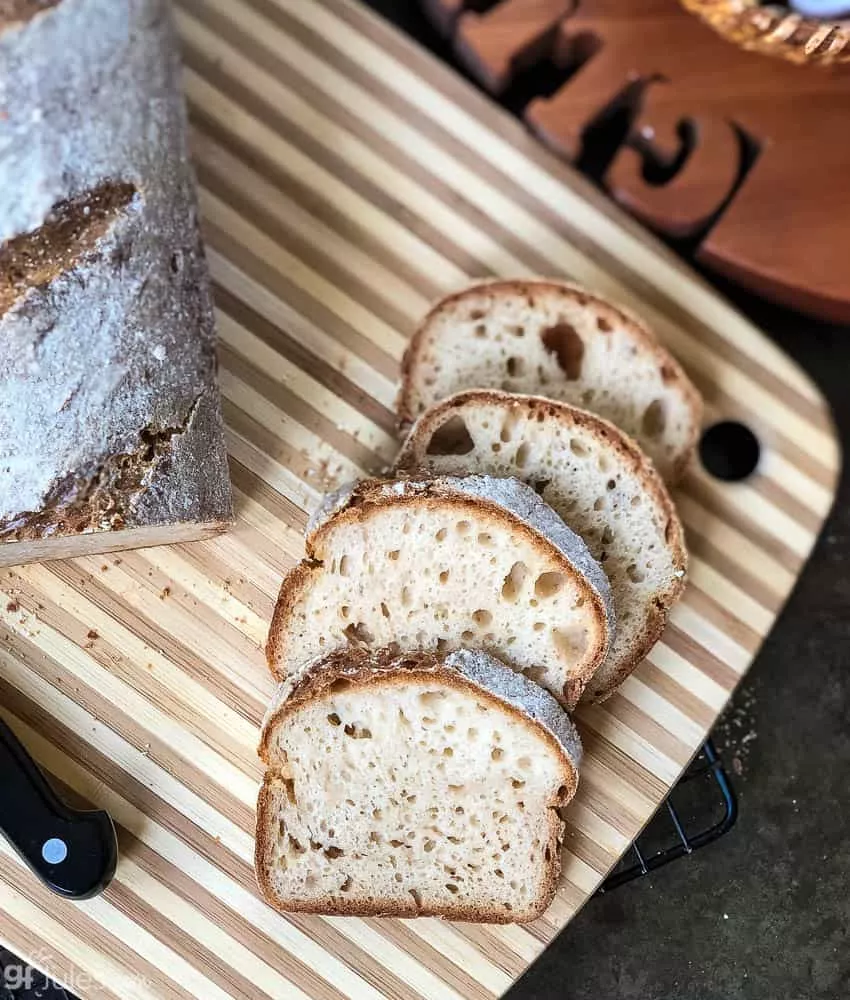
Buckwheat bread sourdough
Here it is: the much anticipated gluten free sourdough bread recipe! I understand it probably feels buckwheat bread sourdough I’m being a giant tease, but it’s been so hard to contain my excitement, that I’ve just had to share! I’ve baked experiment after experiment, tweaking it here and there to account for lots of variables.
I urge you to hang in there and read through my entire post, as I outline what has worked best and what has not worked best for me. There are definitely some tricks of the trade. Gluten Free Sourdough Basics For those who love and miss sourdough, take heart! The art of making sourdough isn’t lost without the gluten.
There’s still a lot of feeding, caring and waiting for the starter to mature and bloom into all its potential. I just couldn’t throw any away when I’ve tended to it for so long! It’s like a little sourdough baby and you just can’t toss it out — I care about it! Some things are the same about making gluten free sourdough bread as they are with making any other gluten free bread. There’s no kneading the bread and stretching the gluten because there’s no gluten!
Gluten free flours are tricky business. I’ve been gluten free since 1999! I’ve been tweaking and improving it ever since. Not to put too fine a point on it, but tenths of a percentage point difference in proportions and a different brand or country of origin for any given ingredient are things that can make huge changes in outcomes. It amazes me all the time how tiny variances make big differences. Selfishly, I didn’t want to have to make it in my kitchen every time I baked! For more help with gluten free bread baking, in general, hop to my 18 Top Gluten Free Bread Baking Tips.
So back to the recipe at hand. Making Gluten Free Sourdough Starter You’ll first need to make the gluten free starter. ONE QUICK NOTE: while most dry yeast is gluten-free, some are not. There is a new Platinum Sourdough Yeast out from Red Star which is made with both rye and wheat.
DO NOT USE THIS YEAST to create your gluten free starter! You’ll need to be sure you have a non-reactive container to store your starter in: glass, glazed pottery, stainless steel, or food-grade plastic will work. Make sure the container is large enough to hold your starter for the duration — it will grow! I found that transferring my starter to a bowl to mix in more gluten free flour and water and then transferring it back to jars worked for me, but you may find another method that you prefer. You’ll also want to have some cheesecloth or muslin to cover your starter for the first week or two when it’s on the counter. Note: while I have only made the gluten free sourdough starter in the measurements given below, I have discussed this with other readers and using the same proportions — but halving or quartering the recipe — does appear to yield the same results. Furthermore, the below recipe has been modified to reflect the notes from other readers over the past many months who have added their recipe tips from their own experimentation.
Many thanks to all who have taken the time to contribute! Please read through all the steps below before emailing me with questions. I have made every attempt to address most issues for you, and your fellow gluten free bakers have also addressed many questions in the comments. The number one issue is that folks feel like their gluten free sourdough starter isn’t active enough and are afraid they must throw it out. Add 1 teaspoon more yeast or yogurt. Add 1 tablespoon honey or agave, maple syrup, date syrup or coconut nectar. The protein and wild yeasts more likely to be present in these flours may help to re-energize the starter.
Making a homemade gluten free sourdough starter can be a hugely rewarding process! Instructions To make the gluten free sourdough starter, add starter ingredients to a non-reactive bowl or container made of glass, stainless steel or food-grade plastic. Whisk together until no lumps are present and all the flour is incorporated, then set aside with a loose cloth covering the top. The room should be at least 70F, or place it in a warmer location like near your oven or in a warmer room. Re-cover and allow the mixture to rest for 24 hours. At this point, the starter should show signs of activity, but if not, don’t despair, and don’t throw it out!
Also, be sure your starter is not too thick. It should be the consistency of pancake batter, not dough. Add more filtered water if necessary — if the starter is too thick, it cannot bubble and grow. You can place some of the more active discards in a separate container if you’re like me and can’t bear to throw it away each time!